Ka-50 Black Shark 2
The Black Shark was the first module to be released for what was later to become DCS. Alongside the A-10C it was released as a separate simulator when it became clear that the old LOMAC game engine would not be a suitable basis for the sim. A while later, both games were re-envisoned as modules in a shared framework — DCS World — and Black Shark was revisited and re-relased as DCS: Black Shark 2.
The “Black Shark” in question is the single-seater Ka-50 attack helicopter, with the distinctive Kamov coaxial rotors — an advanced scouting and anti-tank helicopter that does away with the usual set-up of having flying, navigation, and weapons employment be split between a pilot and a co-pilot.
Features
To accomplish this feat, the Ka-50 comes equipped with a string of helper systems to aid and reduce the workload of the pilot:
- An advanced autopilot that manages engines and rotors to varying degrees — from simply giving acting as stabilisers and providing cyclic input cues, all the way to full flight automation and target- and route following.
- The Shkval electro-optical targeting system, including head-mounted sight (HMS) aiming and automated target search.
- Laser-guided Vikhr and Kh-25ML missiles.
- A built-in adjustable 30mm auto cannon with automated aiming.
- Additional dumb weapons including free-fall bombs, cluster-munition dispensers, UPK-23 cannons, and S-13 and S-8 rockets.
- ABRIS on-board GPS-based navigation and PVI800 INS navigation systems with data linking.
- …and dual rotors. This cannot be stressed enough.
Comes with the built-in campaigns Deployment, Georgian Oil War, and Operation Medvedev II.
Flying the Ka-50
The Ka-50 is often compared to the A-10C because both are complex, systems-heavy, single-pilot attack aircraft. However, they are in many ways each other's exact opposites: the A-10C is easy to fly, but difficult to employ because of its complex set of sensors and weapons delivery modes. The Ka-50 has a very standardised way of delivering weapons, but is not easy to fly.
At the same time, the Ka-50 is often said to be the easiest of the DCS helicopters because of how much help the pilot gets from the built-in systems. Both perspectives are entirely true and accurate at once. The Ka-50 is easy to fly because the automation takes care of almost all the flying, but it is also difficult to fly exactly because you may end up fighting with that automation a lot unless you understand what it does and when and how it should be overridden or left alone. There is a complex interplay between stabilisation modes and trimming, all of which operate very differently than any other helicopter or fixed-wing airplane.
Autopilot modes
In truth, under normal circumstances, you do not so much fly the Ka-50 as program it, somewhat (but not entirely) like a fly-by-wire system in a regular airplane, but with far more authority and memory in relation to the pilot's inputs. New pilots that end up fighting the autopilot generally do so because one or more control channels have been left on with instructions that conflict with what the pilot actually wants, or because of increasingly out-of-whack trim settings.
The autopilot uses four main control channels to adjust the rotor pitch, attitude, and thrust:
- К (крен) — Bank dampener/bank hold.
- Т (тангаж) — Pitch dampener/pitch hold.
- Н (направление) — Heading/course hold:
- В (высота) — Altitude hold.
The cyclic trim button is used to set a desired bank and pitch angles, and the autopilot then try to maintain those angles until the respective channels are turned off or the pilot inputs new settings. The heading channel adjusts the total torque depending on whether it is supposed to track a target (targeting АДВ button), follow the current course (collective МАРШ switch) and/or follow a course or track heading (autopilot ЗК-ЛЗП switch), and also depending on whether rudder trim is turned on in the aircraft settings or no. The altitude hold adjusts rotor thrust depending on the collective brake, the ВИСЕНИЕ hover mode controlled from the cyclic, and on the collective СНИЖЕН switch.
The pitch and bank channels are generally always turned on, but can be dialled back from being automated hold modes to merely act as dampeners by engaging the flight director channel (ДИР УПР button). In this mode, the pilot has more direct control over pitch, bank, and thrust, and the required cyclic and collective input for the desired attitude is shown on the HUD — it is up to the pilot to align the helicopter datum with those cues.
Note: In the current 2.5 release and open beta versions, deferred shading makes the autopilot button lighting seem inverted: when “lit up” they appear darker and more dim than when a channel is turned off and the button light is not shining.
Cockpit overview
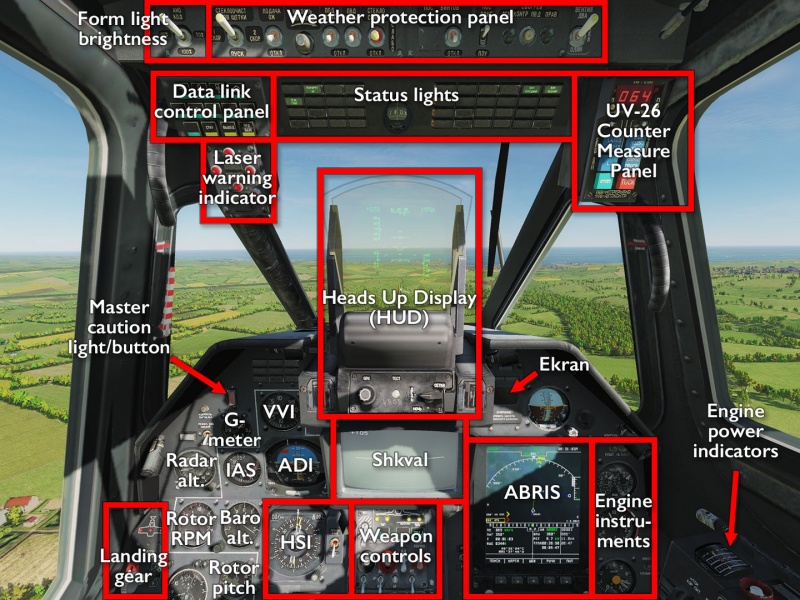
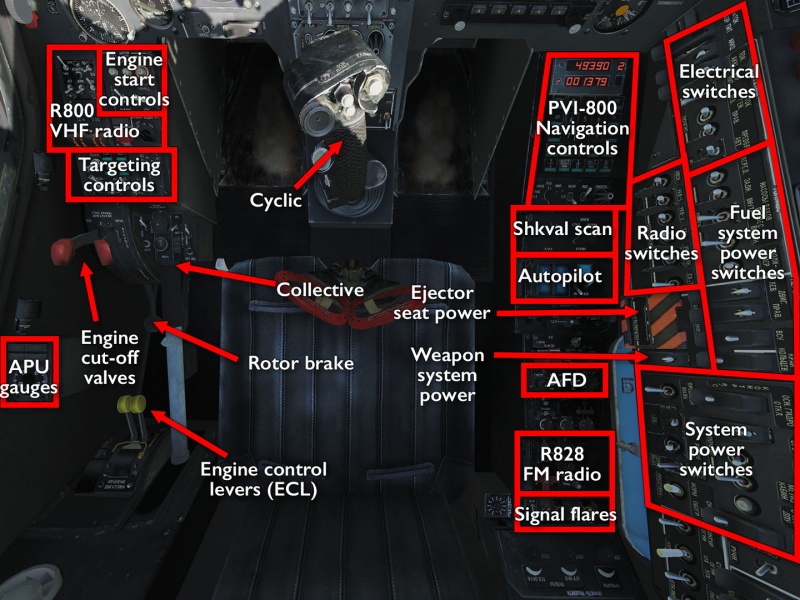
The Ka-50 has lots of controls — more even than is shown in the above images — but half of them are simply used to turn systems on at the before take-off, and off again when you return to base. The right wall panel contains most of the core system power switches, and the back panel over your right shoulder contains some setting dials, system tests, and advanced power switches. With the exception of maybe some of the lighting switches, in case a mission transitions from day to night, none of these need to be touched in flight.
At least not until something catches fire and you need to start problem-solving.
The following descriptions use the Russian button labels — numerous English cockpit liveries are available that make the different functions fairly obvious.
Getting into the air
Like so many of the other full-fidelity modules, getting the Ka-50 into the air from a cold start is a complicated process, and as usual, the RWinHome shortcut can be used to make the game run through it for you. Unlike, say, the A-10C or M2000C, the process is not long because of a time-consuming navigation system alignment process, but simply because there is a lot to turn on, and because the complex engines and coaxial rotor systems need time to warm up properly.
The Ka-50 does indeed have navigation systems that need to be aligned — two of them, in fact — but they are largely automated and will commonly be done long before the rest of the checklist is complete. In addition, they can fairly trivially be re-aligned and calibrated in-flight, should you need to get off the ground quickly. For the truly patient, though, there is a special 30-minute long precision alignment process that can be run if you need an excuse to grab something to eat before heading out.
For the full process, refer to the manual or the usual Chuck's guide linked below. In broad strokes, the process consists of:
- Turning batteries, radios, and fuel pumps on on the right wall panel.
- Turning the APU on on the left panel.
- Unlocking the rotors, opening the fuel flow to the engines, and starting the engines.
- Turning the engines on and idling them until all hydraulics have warmed up.
- Turning on generators as the engines are able to provide more power.
- With the aircraft fully powered, turning on and setting up all remaining systems:
- ABRIS and INU
- Weapons and countermeasures
- Communications and data link
- Autopilot and engine automation
- Perform a hover check.
- Glide gently, slowly, but inevitably into the control tower.
- Experience the wonder of the explosive rescue ejector system.
Shooting something
Firing (predominantly) beam-riding Vikhr anti-tank missiles in the Ka-50 is a fairly involved process that some may recognise from how missile deployment in the Su-25 and Su-25T works, only with more fiddly details. Even so, it is almost completely controlled through the HOTAS, and a couple of buttons and switches located right next to the collective. The process can be further automated through the use of the head-mounted sight and an auto-scan feature that detects and locks up targets while the pilot keeps an eye out for more important things.
The more standardised, semi-automated method lets the pilot pick targets, but leaves it up to the computers to determine whether firing parameters are met, again similar to the Frogfoot variants. Also similar to those, being mindful of how much the laser is used is important: leaving targets tracked more than is necessary, or repeated locking and ranging targets, will overheat and eventually burn out the laser, which turns your most potent weapon into unguided, non-aimable dumb-fire rockets.
Again, for more in-depth procedures, refer to the manual, guides, and checklists — most of it entails manipulating the Shkval electro-optical sensor.
Shkval
The И-251 “Shkval” is a day-time magnified camera tied to the Ka-50's laser designator and targeting systems, used to manually or automatically detect and track ground and aerial targets, as well as to provide position update data for INS calculation. It can be used at night, but making out and tracking targets will be down to the eyesight of the pilot since the lighting conditions will be too poor for the system to do automatically.
The general process for tracking and firing on a target with Vikhrs consists of:
- (Optionally) turning the HMS aiming on with the ОБЗ switch.
- (Optionally) selecting a target type and movement prediction mode: ППС for head-on airborne, ВЦ for other airborne, or НПЦ for moving ground target. .
- Uncage the Shkval — if the HMS is used, it will immediately be slaved to the sight until the uncage button is released.
- Slew the tracking gate over the desired target using the cyclic control hat unless target processing has already done so.
- Adjust zoom (УПЗ-ШПЗ switch) and tracking gate size (РАМКА selector) to match the target using the controls on the collective.
- Arm the laser (ИЗЛ switch) and designate the target (collective АВТ ЗАХВ button) — if it is successfully detected, the tracking gate will vibrate.
- Master arm on; outer pylons selected (since that is where the Vikhrs will be loaded).
- Manoevure the helicopter so the HUD launch zone cue covers the targeting cue — if heading hold and “turn on target” autopilot modes are active, the helicopter will do most of this on its own, but some final pilot input is usually needed.
- Pickle. If all launch parameters are met, a missile will (eventually) leave the tubes.
- Wait until splash; reset targeting; laser arm off; master arm off.
And yes, laser arm is more important than master arm, just to ensure that none of the automation fires the laser needlessly.
ABRIS
Links and files
- Tippis' Checklist (see also kneeboard mods).
- Chuck's Ka-50 guide.
- DCS: Black Shark 2 in the DCS shop.
Related DCS modules
- Republic for Ka-50 campaign.
More information
- Kamov Ka-50 on wikpedia.
- Ka-50 HOKUM / Black Shark / Werewolf on globalsecurity.org
| DCS World | |
|---|---|
| Helicopter modules (full sim) |
Ka‑50 Black Shark 2 · Mi‑8MTV2 Magnificent Eight · Mi‑24P Hind · SA342L, M, Mistral, and Minigun Gazelle · UH‑1H Huey |


