LotATC 4 DCS
LotATC 4 DCS — originally called “Lock-on tiny ATC” — is a client-side stand-alone client and a server-side plugin that lets players connect to a DCS server and take on roles such as Air Traffic Controllers (ATC), Ground Control Intercept (GCI) or Airborne Early Warning And Control (AWACS) or even, with the right server setup, as JSTARS (like AWACS but for ground targets). You become the eyes in the sky for your team, directing them towards targets and warning them of threats, increasing their situational awareness of what is going on.
A lot of this can already be done in DCS on its own, but what LotATC does is add some proper DCS-iness to the proceedings: more simulation, more controls, more tools to make your life easier but also more complexity to make it that much more difficult again, and more configurability to tweak the gameplay. Above all, it lets you take part in DCS multiplayer scenarios without having to run the demanding DCS client. LotATC can certainly be demanding in its own right, but not nearly on par with the 3D and memory requirements of DCS proper.
Depending on the server settings, aside from the magical omniscient “arcade” mode, LotATC only reports contacts that have been detected by actual in-game radar units such as ground and ship-borne search radars, airport radars and AWACS aircraft. Enemies that are not detected by any of those units will simply not show up — at higher settings, terrain masking and radar elevation limits come into play as well, offering even more opportunities for those sneaky gits to hide.
Note that, unlike DCS' own F10 menu, LotATC will not under any circumstances show missiles and other ordnance — pilots will have to keep track of whether they are being shot at or not on their own.
Downloading and installing
Both the client and the server plugin can be downloaded from the LotATC website. Unless you are planning on running a server on your own, only the client is needed, and this is intended for online play only. Installing the client is straight-forward — just run the exe file and hope that the developer is reasonably virus and miner-free.
Licenses?!
The eagle-eyed will quickly notice that they are downloading a free demo version of the client. This can only mean one thing: LotATC is payware and you need a €25 license to unlock the full thing.
For the client, this is entirely true, except that as a general rule, unless you intend to hop around on a lot of smaller servers, you do not actually need to own that license yourself. Instead, LotATC supports server-side licenses that lets the server host a number of licensed LotATC slots, and anyone who connects to one of those slots gets the full functionality, even if they run the “free demo” client. Most larger servers that use LotATC (including the goon server) will have a couple of server-side licenses.
Connecting and setting up
The first thing you need to do when launching LotATC is create and/or pick a server to connect to. Click the connect button in the upper left corner and:
- Click the new server button.
- Name the server for later.
- Enter the IP and (if needed and the server runs on anything other than the standard) a port number. Unless a very fancy setup is being used, this will be the same IP as the underlying DCS server.
- Pick a side — red or blue — and provide the appropriate password. The defaults are simply “red” and “blue” for the respective sides, but check with the server admins if that does not work.
- Pick a callsign to use in-game.
- Save the server favourite.
- Connect to the server.
If everything works out properly, you will end up on the basic screen showing a map of the conflict area with a myriad of symbols dotting the landscape. If the server is paused, nothing will obviously happen since the plug-in on the other side is suspended and not sending anything.
The basic screen
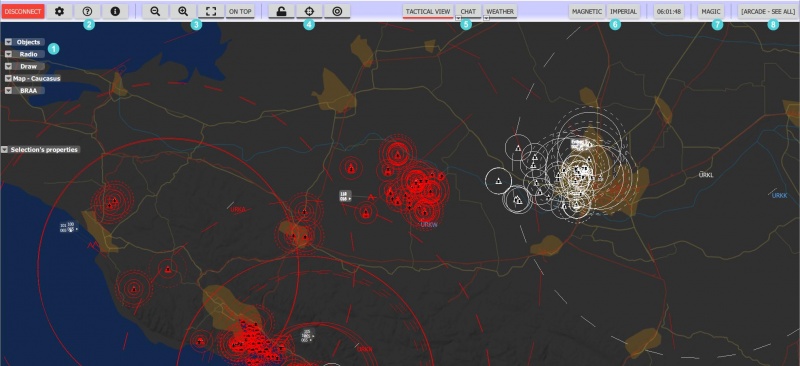
Connecting to a server presents you with the fully populated tactical view. Aside from the large, obvious map with its unit icons, threat circles, and radar returns, there are eight clusters of UI elements to be aware of:
- Fold-out information windows. This is where all the action happens that sets LotATC apart from DCS' F10 map view. Double-clicking on a title bar folds and unfolds the window and the drop-down triangle offers more in-depth options for the window. Of particular importance are the Map, BRAA, and Selection's Properties windows, since these adjust your view and present the information you need to convey to the other players.
- App buttons: settings, help, and about the program. The settings page does what one would expect — it lets you define the overall look, feel, and performance of LotATC. Of particular note is the “Items” tab, where you pick your symbology and target colour scheme.
- Display controls: map zoom, windows full-screen and on-top buttons.
- Reference point buttons. Locks/unlocks the move and zoom controls; shows/hides range rings around the selected object; and toggles between fixed (Bullseye) and relative measurements.
- Main display buttons. Chooses between tactical view (the map), chat view, and “weather” (actually mission briefing) view to occupy the main window. The latter two can also be turned into dialogue windows so you can have all three up at once.
- Unit buttons. Switch between magnetic and true heading modes, and between metric and imperial units for measurements.
- Controller button. This folds out the list of active controllers on the server and offers a convenient way to take control over airports without having to hunt for them on the map.
- Server settings button. This folds out an information window explaining the profile and detection settings currently in use on the server.
From here, the three most basic controls are:
- LClick-drag: move the map around.
- Scroll Wheel: zoom in and out.
- RClick-drag: measure bearings and distances.
The latter should make the numbers appear in a pop-up at the bottom of the screen — if it does not, your program window may be stretched outside the screen, or parts of it hidden behind the Windows UI. As this information is critical to almost everything else, make sure to adjust the window to fit everything you need to see.
Map options
The most obvious part of setting up LotATC is to go into the gear icon at the top of the screen and set up iconography and colour schemes from there. The less obvious, but arguably more important, step of the setup is to open up the Map window (double click its title and resize as needed, or use the triangle menu to maximise it).
From here, you can manage the clutter level of the map: the opacity and colour of terrain features such as rivers, mountains, towns, roads, and borders; target filters by speed, altitude, or just separating air and ground targets; and various information overlays such as threat circles or drawings. Here, you can also set the coordinate format if you want to feed target spots to various aircraft that use different measuring systems.
As a basic level of declutter, it is probably useful to make a couple of changes:
- Open up the filters tab.
- Turn on “Hide ground units” — this fades ground units into the background to where they are still visible, but will not compete visually with airborne targets.
- Open up the optiosn tab.
- Turn off “Show circles” — the circles are good for guiding aircraft through airspace with a heavy SAM presence, and at higher simulation levels to get an idea of where your own coverage and blind spots are, but for general purposes, the circles can make it difficult to actually see individual returns.
With lots of ground units, in particular, these two settings will drastically reduce the amount of overlapping junk on the map screen.
Note: if you accidentally assign a particularly hideous colour to any feature, you can always ShiftLClick the colour selection box to reset it.
Playing as ATC
It is called LotATC, so the immediately obvious usage should be to play as an Air Traffic Controller, right? And yet, it is the part of LotATC that needs the most amount of UI fiddling to get going.
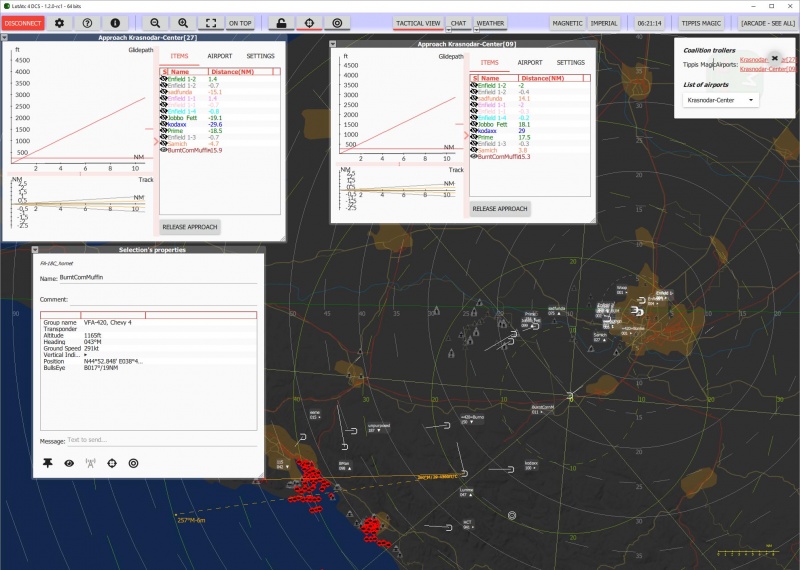
As ATC, your job is to monitor the airspace around a selected airport and help pilots stay on track and on glideslope as they come in for landing, and possibly also to deconflict air traffic. Note, however, that other than on the lowest “Arcade” realism setting, you will not see aircraft on the ground and will not be able to tell if and when someone is occupying a runway. With a bit of luck, the pilots will tell you over SRS or something similar, and you can keep track of things that way, but you never know…
To take on the ATC role for an airport, you need to:
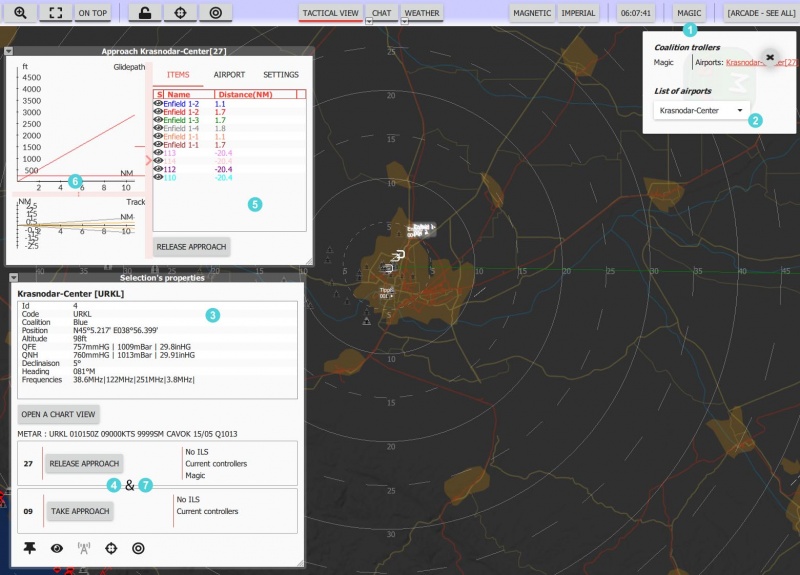
- Click the controller button at the top of the screen (it should show the pseudonym/call sign).
- Select an airport in the drop-down list in the controller window — the airport will be highlighted on the map and a range/compass rose displayed around it.
- Open up (and keep open) the Selection's properties window to see airport data that the pilots might need in their navigation systems.
- Click the “Take Approach” button for the runway(s) you want to control. This will open up the Approach window.
- The approach window will show a list of aircraft current in the zone of that airport. The eye icons can be used to filter them out of the approach display in case they are just being nuisances, zooming around without actually trying to land.
- Aircraft on or near the runway glideslope will show up in the Glidepath and Track graphs, showing their altitude and track relative to the ideal glideslope.
- Once you are done, click the “Release approach” button in the Selection's properties window.
Note that this window also has a chart view button that gives you access to the airport ground chart, should you need to help people figure out where to go on the ground. To offer proper tower services, however, this really needs to be combined with the F11 view in the actual DCS client.
Playing as GCI/AWACS
While ATC may be the more obvious use of LotATC, being part of its name and all, the more common and useful role to play is that of GCI or AWACS and guide pilots to (or away from) air and ground threats. Unlike ATC, this is also a very straight-forward process, contained to a single window and lots of use of the measuring tool.
Aside from the map (to actually see the radar returns), the main elements to keep track of are:
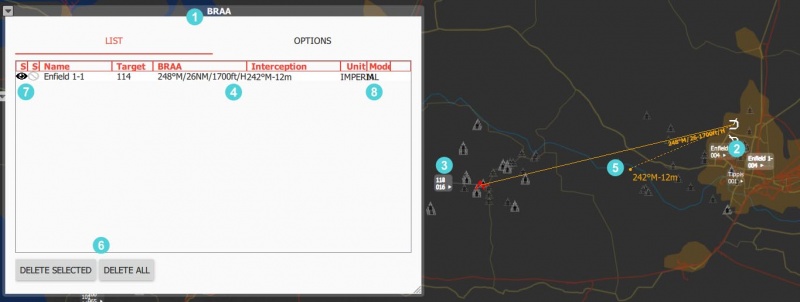
- The BRAA window, showing continuous target tracks. You create these tracks by…
- …finding a suitable friendly radar return and hovering over it — a small pulsing circle should appear over the symbol. Note, however, that you need to hover over the small info box next to the return rather than the symbol itself.
- CtrlRClick-drag a line out from the friendly unit over to an enemy — again, a pulsing circle should appear over the target once you hover the target info box correctly.
- You can then release the right mouse button, and a tracking solution will appear in the BRAA window, listing the tracking aircraft, the target, the BRAA and (if available) intercept solutions. You may want to adjust the column width in this table to fit and display all the information more clearly.
- The same information is displayed visually on the map, with a solid line showing the BRAA track and a dotted line showing the intercept vector, both with their respective numeral data located next to them.
- If there are too many tracks, or they have become irrelevant, you can delete a selected track (or just clear all tracks) with the buttons at the bottom of the BRAA window.
- The two icons at the beginning of each row offer some declutter and automation for the poor overworked GCI: the eye shows and hides current tracks on the map, and if the tracking aircraft is a human player, a second “beacon” icon will be available — as long as the beacon is active, the player will receive continuous in-game BRAA updates through the chat interface (use with caution as this can be very spammy at times).
- The last two columns can be clicked to change the units used for the calculated vectors.
It is also possible to set up BRAA tracking between friendly aircraft, to help lost wingmen for instance, or between a plane and an airport if they need continuous navigation assistance. The latter can be a bit finicky due to how airport selection works, though.
BRAA and Intercepts
The advantage of setting up a continuous track is that it remains listed in the window until either aircraft goes away or it is removed, so you no longer have to use the measure tool (using just RClick-drag) to keep figuring out the relative position between two aircraft.
The window gives you the full BRAA (Bearing, Range, Altitude, Aspect) call-out that you need to tell the pilot, and if the current flight paths of the two aircraft will at some point merge, an intercept solution will also appear. The latter is particularly handy for short-ranged or completely radar-less aircraft, since they will not as easily know exactly where to go just from the BRAA call-out alone. Even more capable aircraft might need this when a target is simply out of range of their sensors, and they need to know where to go so they can pick up the chase on their own.
The intercept course will of course only hold true if the target aircraft remains at a constant speed and heading, so remember to keep the pilot updated as the situation changes.
Simulation profiles
With the easiest “Arcade” server setting, all vehicles of all types will be revealed by default, along with their names and types. As the simulation level increases, this will no longer be true. At the most advanced setting, nothing is known about the returns other than their speeds and altitudes, and you will need to manually assign symbols, types, and names to them to keep everything apart.
At least that is the general idea — currently, the Objects window lists just about everything known with their respective units types, which circumvents some of the intended difficulty. Pretend it is just the radar operator looking up the profile in the handbook or some such…
However, this does mean that players need to report in their positions so the GCI/ATC can figure out who is who and assign the right targets and flights directions to the right person. All of this is done in the Selection's Properties window by filling in the appropriate fields and picking symbols from the drop-down list to reflect the best of the operator's knowledge.
Arcade
Arcade settings effectively work as a fully permissive spectator view in DCS' F10 map, with the exception that it still does not show missiles and other munition. All air and ground craft are visible at all times, and all unit names and types are filled in by default. For all intents and purposes, there is no radar simulation going on — it is just a different way to interact with a DCS multiplayer session.
Basic
The basic profile adds in some simulationist aspects. Radar is no longer omniscient, but rather use simple range to check what targets are visible, creating detection sphere around all radar units. In addition, terrain masking is in effect — hiding in valleys and behind mountains makes a difference. Ground and sea units only show up if they are at least medium-range radar emitters, simulating passive detection of those emissions. Short range units such as Shilkas do not show up, and enemy units still have to be within detection range of friendly radar positions to be detected.
In addition, slow air units are lost in ground clutter, so slow-moving helicopters and taxiing aircraft will not be visible. The latter significant affects the ability to manage ground operations as ATC.
Aircraft are also no longer automatically assigned a symbol unless they are AWACS planes (on either side) or allied helicopters. Everything else will have “unknown” symbols by default and it is up to the GCI to set these manually.
Realistic
In realistic mode, on top of the restrictions already in play in the basic profile, radars now have elevation limits. Anything flying too close and too high above (or too low below, in case of airborne radar) will be lost since the radar cannot point straight up (or down).
In addition, helicopters are no longer automatically categorised — only AWACS planes get some kind of symbol. There are also a lot more icons for the GCI to choose between in their categorisation of friendly and enemy targets.
Advanced realistic
To really increase the workload, advanced realistic adds the complication that nothing is known from the start. Targets have to be manually assigned with a coalition, icon, type, and even a name when they first show up, or they will appear as an unknown, neutral cross with just a heading, speed, and altitude assigned to it.
Custom
Finally, there is a custom setting where the server administrator can mix and match different detection profiles, tagging and categorising automation, speed and terrain filters, and most other parameters that separate the regular profiles. A close study of the Server profile window (top right button in the main LotATC window) is recommended to understand exactly how things are set up.
More in-depth descriptions can be found on The LotATC website's page on detection profiles.
Player communication
The final piece of the puzzle is to actually be able to talk to the players you are trying to direct — there is little point to know that some poor soul is 5° off glideslope if you can't tell them, after all.
LotATC actually comes with some built-in functionality for doing so by hooking into the DCS chat system. As mentioned in the GCI/AWACS section, you can even automate some messages to players. At the moment, however, this functionality is only half-working. While there is ostensibly some means to talk to just one coalition, that only works for the Red side so this is of little use on a PvP server. On a PvE server, on the other hand, the LotATC player can just use “talk to all” messaging since there is no other side that might be spying on you. Just open up the Chat window (and if it is not set up as such already, use the triangle menu to turn it into a dialogue window since it becomes a bit bulky otherwise).
There is also some rather obsolete built-in radio functionality that connects LotATC to an old TeamSpeak plugin, but this is not the 1990s so this is not particularly relevant.
A far better option (aside from simple voip solutions like Discord) is to just use DCS SimpleRadio Standalone in its External AWACS/GCI Mode (EAM), where SRS lets you interact with and talk over radios without having to be in-game and in an airplane to do so. It even has a special AWACS/GCI radio stack that lets you monitor a whole slew of different frequencies for maximum information overload customer service. While the LotATC website talks about some eventual SRS integration, the existence of EAM makes such integration largely unnecessary.
Now, all you have to do is read up on incomprehensible radio lingo to really ensure that all this efforts creates more confusion than ever for your fellow players.


