A-10C Warthog
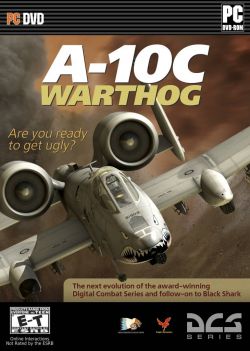
This is it — the quintessential and probably most iconic DCS module. It is one of the most complete and most complex modules, yet also one of the easiest to get into. Much like how the A-10C is an upgrade from the original A-10, this module is a continuation of the A-10A that was present in LOMAC and subsequently released as part of the FC3 package.
Features
Anyone who has heard about the A-10C knows about the BRRRRRT — the GAU-8 30mm gatling that someone bolted a pair of wings and engines on and called an airplane. And yet, the cannon is not actually the key feature of the aircraft, nor is its famous armoured cockpit and ability to shrug off ground fire or even the amount of ordnance that it can bring along.
No, the three main features of the A-10C are:
- A comprehensive, extensible, and highly integrated sensor suite to allow precision delivery of almost any kind of weapon, including the ability to link those sensors to outside sources in the air or on the ground.
- A vast array of radio communication and navigation equipment to keep in touch with, and have situational awareness of the relative position to, other combat elements, including a sophisticated flight data computer that tracks a myriad of geographical, environmental, and tactical data points.
- An elaborate HOTAS and MFD setup to quickly manipulate all of the above.
Specifically, the A-10C features:
- TACAN, ILS, VHF and UHF AM, and VHF FM radio receivers to be able to talk to everything and everyone at once.
- INS, GPS, and radio direction finding equipment.
- Helmet NVG, Maverick sensor linking, LITENING targeting pod, and TAD digital moving map and linked unit display.
- Programmable automated and manual threat warning and countermeasure management (but the automation is pretty stupid and is actually rather likely to get you killed if you rely on it too much).
- Programmable and pre-loaded flight and navigation data for storage of steerpoints, mark points, initial points, airfield data, weather data, and terrain data.
- Computer-aided and calculated release and weapon impact points, including automated adjustments for weather and terrain conditions.
- More bombs and more loiter time that is actually reasonable.
Comes with the built-in campaigns A-10C Sturmovik and Georgian Hammer.
A-10C II Tank Killer
| This is a beta module.
This module is still being developed and may still be missing some features and equipment options. It is playable and most of the content is there, but some final touches and fixes for minor bugs are still in the works. It is probably safe to buy unless you crave absolute fidelity and/or very few bugs. |
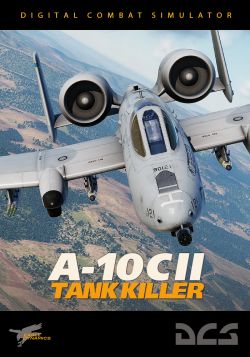
In 2020, Eagle Dynamics released a paid update to the venerable A-10C module in the form of A-10C II Tank Killer. This is best qualified as a kind of temporary expandalone: previous owners of the A-10C can get it a reduced price to get access to the new functionality whereas first-timers can (and probably should) buy directly in the Tank Killer without buying the regular A-10C first. Over time, the older module will be phased out and only A-10C II will remain. In the interim period, the classical module is available at a slightly lower cost, if one wants to dip one's toes in the BRRRRRT waters, but the margin between the two modules is so small that it is really more akin to dipping one's legs and entire torso — might as well go for the full plunge.
The Tank Killer update is all about the extra armaments and cockpit equipment available in later blocks of the aircraft. Specifically, the module adds:
- New precision weaponry in the form of APKWS laser-guided rockets, AGM-65L laser Mavericks, and GBU-54 laser JDAM:s
- The almost game-changing Scorpion Helmet-Mounted Integrated Cueing System, letting you look to aim and to manipulate your sensors to an unprecedented degree.
- Even more radios
- New internal and external visuals, including options for new or worn textures.
Of these, the HMCS is perhaps surprisingly the thing that most profoundly changes how the aircraft is flow since it is effectively a new sensor on its own in an already sensor-heavy aircraft. It comes with a whole slew of new HOTAS inputs to learn and master in the already complex world of SOI and SPI juggling in the A-10.
At the same time, it is also worth remembering that the Tank Killer module is still in Early Access. It is still missing one radio, and while it builds on a solid and long-proven foundation in the old Warthog module, the new feature additions have also introduced a number of new bugs and oddities that need to be addressed until the A-10C II is quite as solid and stable as the base A-10C is.
Flying the A-10C
The A-10C is a very simple plane to fly, in large part because it is just a very rugged and stable platform that provides almost every conceivable aid to the pilot to deal with a complex threat environment. At the same time, it is a very difficult plane to actually employ, for many of the same reasons. It has so many different interlinked and interoperating systems, so many backup systems, and so many different stores and weapons that could be attached to it that, even at almost 700 pages, the included manual only scratches the surface on most of them. While surprisingly manoeuvrable, it is also slightly slower than snot going uphill — if you put yourself in a bad spot, odds are not great that you will be able to fly your way out of that situation.
The upside is, once (and if) you master the A-10C, everything else will seem simple to understand in comparison. And while other planes might offer more power and manoeuvrability to get out of harm's way, nothing will match the A-10:s ability to just stick around and keep throwing more and more precision ordnance at the enemy. Also, at the speeds afforded by the A-10, you will never go fast enough to really hurt yourself… much.
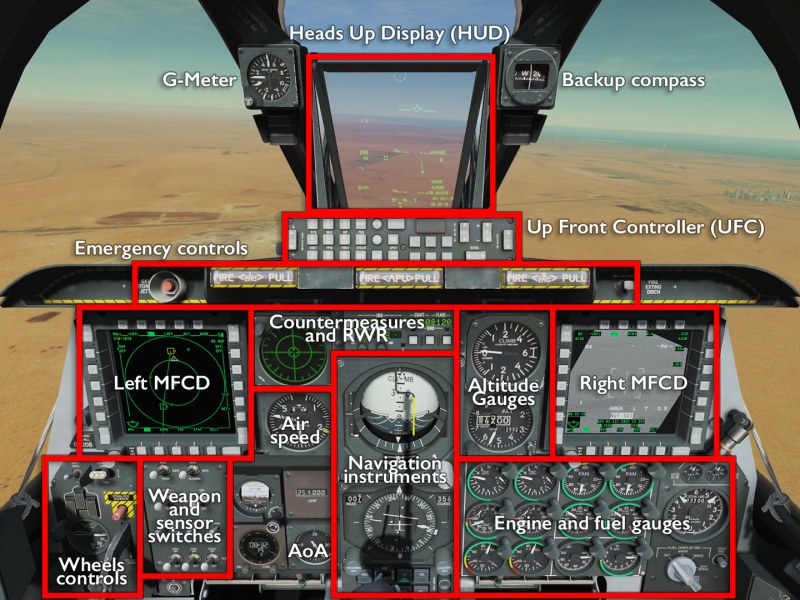
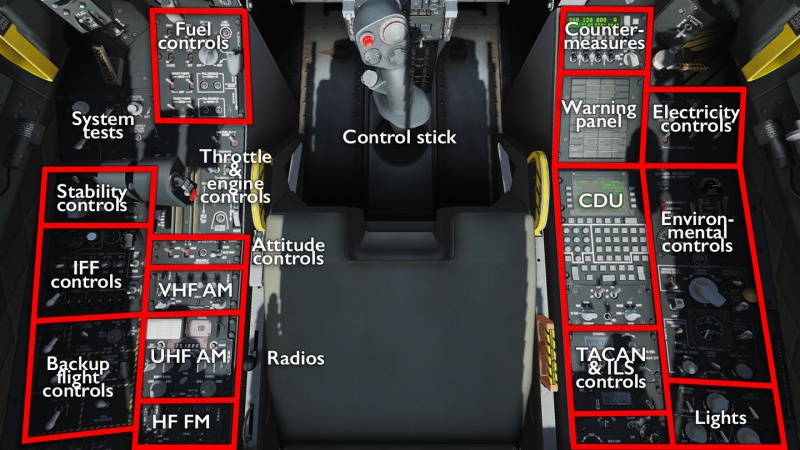
Cockpit overview
Getting into the air
Remember how the A-10C was difficult to employ? This is where that whole problem starts. To get the Hog into the air, a lot of stuff has to be turned on in the right order, or the computers will scream at you and your weapons will not work. Fortunately, there is the RWinHome “cheat” shortcut that runs through the startup for you — unless there is some special setup needed, or any out-of-the-ordinary circumstances, this will usually work. For anything else, consult the manual for the full cold-start procedure, or better yet, look at Chuck's guide linked below.
Even with the auto-start shortcut, however, a cold start will take in excess of 3 minutes, in large part due to the time it takes to align the navigation systems. While you certainly can fly without it, you will not be able to deliver INS-guided weapons, and even accuracy of CCIP deliveries will be slightly off because the aircraft does not quite know what patch of land it is flying over. Alignment can also be done in the air, but will take longer and may end up less accurate unless you fly very straight and level. There is a way to reduce the alignment time by using a fast-align, but it requires a bit of digging around in various on-board computer menus — Ralfi's tutorial linked below demonstrates this process.
Using very broad strokes, a cold start consists of:
- Turning on power and warning your surroundings about what is about to happen.
(Battery → APU → APU generator → Radios and lights.) - Turning engines on and transferring power generation.
(Fuel pumps → throttle out of detent → generators on → APU gen off → APU off.) - Turning on avionics.
(CDU, EGI, Countermeasures, IFFCC/HUD, JTRS, CICU, MFCDs) - Loading systems data.
(GPS and INS alignment, DTS data load.) - Systems setup.
(HUD, DSMS, TAD, CMSP, Navigation options, analogue instruments.) - Controls setup.
(Trim, SAS, anti-skid.) - Turning on and adjust the last few systems.
(EAC, Radar Altimeter, SADL, TGP.) - Securing the cockpit.
(Seat armed, canopy closed, oxygen and environment set.)
With that alphabet soup done, ask for clearance, turn nosewheel on and head for the appropriate runway. From here on and until you reach a target area, the Hog is slightly less complicated than a Cessna since, with all that junk turned on, the plane is doing a so much on its own. Alternatively, as in the Giantbomb video below, you can get strafed while still in your parking spot.
It is also worth nothing that, with the release of the A-10C II Tank Killer module, some of the default switch positions (both in the Tank Killer and in the original Warthog module) were updated to already be in the correct position for a start, which makes older checklists and startup descriptions somewhat inaccurate. It is still worth checking those switches actually are on, but do not be surprised if some steps in older tutorials suddenly seem unnecessary.
Shooting something
To shoot something quickly in the A-10C, look to your weapons switches, turn Master Arm on, Gun/PAC Arm on, and press the Master Mode Control Button (MMCB) on the HOTAS until the HUD says “GUN”. Put the reticle on something that needs to go poof and press the trigger all the way through the second detent. If everything is set up properly and you are flying smoothly, the first trigger detent will engage “Precision Attitude Control” and try to keep the plane from bucking wildly as the gun fires.
To shoot at (but most likely miss) something in the air, turn Master Arm on, go into the DSMS page on (usually) the left MFCD, select AIM-9 and point the seeker marker at something hot. If it is an airplane, you can try to hit it, but since heat seekers in DCS are dumber than goons, they will go after something else instead.
To be a bit more complex, instead select a dumb bomb (or rockets) on the DSMS page, press the MMCB until the HUD says “CCIP”, put the pipper on a target and pickle off whatever you selected. Chances are that you will hit reasonably well, but nothing will happen because the DCS damage model makes ground vehicles not care much about splash damage.
If you want to employ any kind of smart weapon — Mavericks, laser- or INS-guided GBUs — or if you want to use CCRP modes so you do not have to see the target to shoot at it, you will need to get into the horrid maze of insanity that is SOI and SPI management. This is where the complexity of the aircraft really sets in, but the upside is that you will most likely hit dead on this way and actually make things blow up.
SPI and SOI — the key to understanding the A-10C
A large part of what makes the A-10C so tricky to employ is the wide variety of weaponry it is capable of carrying, and the complex set of sensors needed to detect targets and deliver all kinds of munitions on target with high precision. The aircraft is also equipped with three different displays through which these sensors are both read and manipulated. As a result of this, a lot of the combat employment of the A-10C comes down to juggling sensors and the two key concepts in this task are the Sensor of Interest (SOI) and Sensor Point of Interest (SPI).
At the most basic level, neither is difficult to grasp: the SOI is the sensor that is currently being used to target a weapon; the SPI is the point in the world where the weapon is being targeted. The trick lies in being able to quickly identify, select, and control the relevant sensor and hand off SPI:s from one sensor to the next so as to always use the most precise and appropriate means of targeting a given weapon.
For instance, this can be a process of visually spotting a column in the distance, using the HUD to quickly mark that position, and handing over the HUD-controlled SPI to the targeting pod to identify and select individual targets. Then that TGP-controlled SPI can be handed over to the Maverick targeting sensor to allow for a long-distance stand-off shot. Another common SOI/SPI manipulation process is to receive target coordinates from JTAC, which will be displayed on the Tactical Awareness Display (TAD). The TAD is used to designate that spot as SPI, and the SPI as then transferred to the targeting pod for precision adjustment and to set up CCRP delivery and laser designation.
The importance of SOI and SPI management can be summed up in this: between the HUD and the MFDs, you have nine pages and modes that define and set SOI and SPI in various ways; on the HOTAS, there are four four-way hats and two three-position switches that are dedicated to manipulate those sensors and the hand-off of SPIs. This constitutes a majority of the HOTAS controls.
Links and files
- Lobo's Normal Checklist (see also kneeboard mods).
- 476th vFG A-10 Flight Crew Checklist.
- Chuck's A-10C guide at Mudspike.
- DCS: A-10C Warthog in the DCS shop.
- DCS: A-10C II Tank Killer in the DCS shop.
Related DCS modules
- A-10C Basic Flight Training (BFTQ) Campaign by Maple Flag Missions.
- A-10C Advanced Aircraft Training Qualification (AATQ) Campaign by Maple Flag Missions.
- A-10C Tactical Training Qualification (TTQC) Campaign by Maple Flag Missions.
- A-10C 16-2 Red Flag Campaign.
- A-10C The Enemy Within Campaign by Baltic Dragon.
- A-10C Operation Piercing Fury Campaign by Ranger79.
- A-10C Stone Shield Campaign.
- A-10C Operation Persian Freedom Campaign by Ground Pounder Sims.
More information

- Fairchild Republic A-10 Thunderbolt II on wikpedia.
- A-10/OA-10 Thunderbolt II on globalsecurity.org
- Bunyap's ‘On the Range’ tutorial series (for A-10A and A-10C).
- Matt Wagner's A-10C Warthog and A-10C II Tank Killer series.
- Ralfidude's A-10C Tutorials series.


